Evolve wouldn’t ship an electric skateboard from Australia to New Zealand. So screw em, I’ll build it myself! I knew nothing about building electric skateboards, and now I’m riding one I built myself, and it’s an amazing ride.
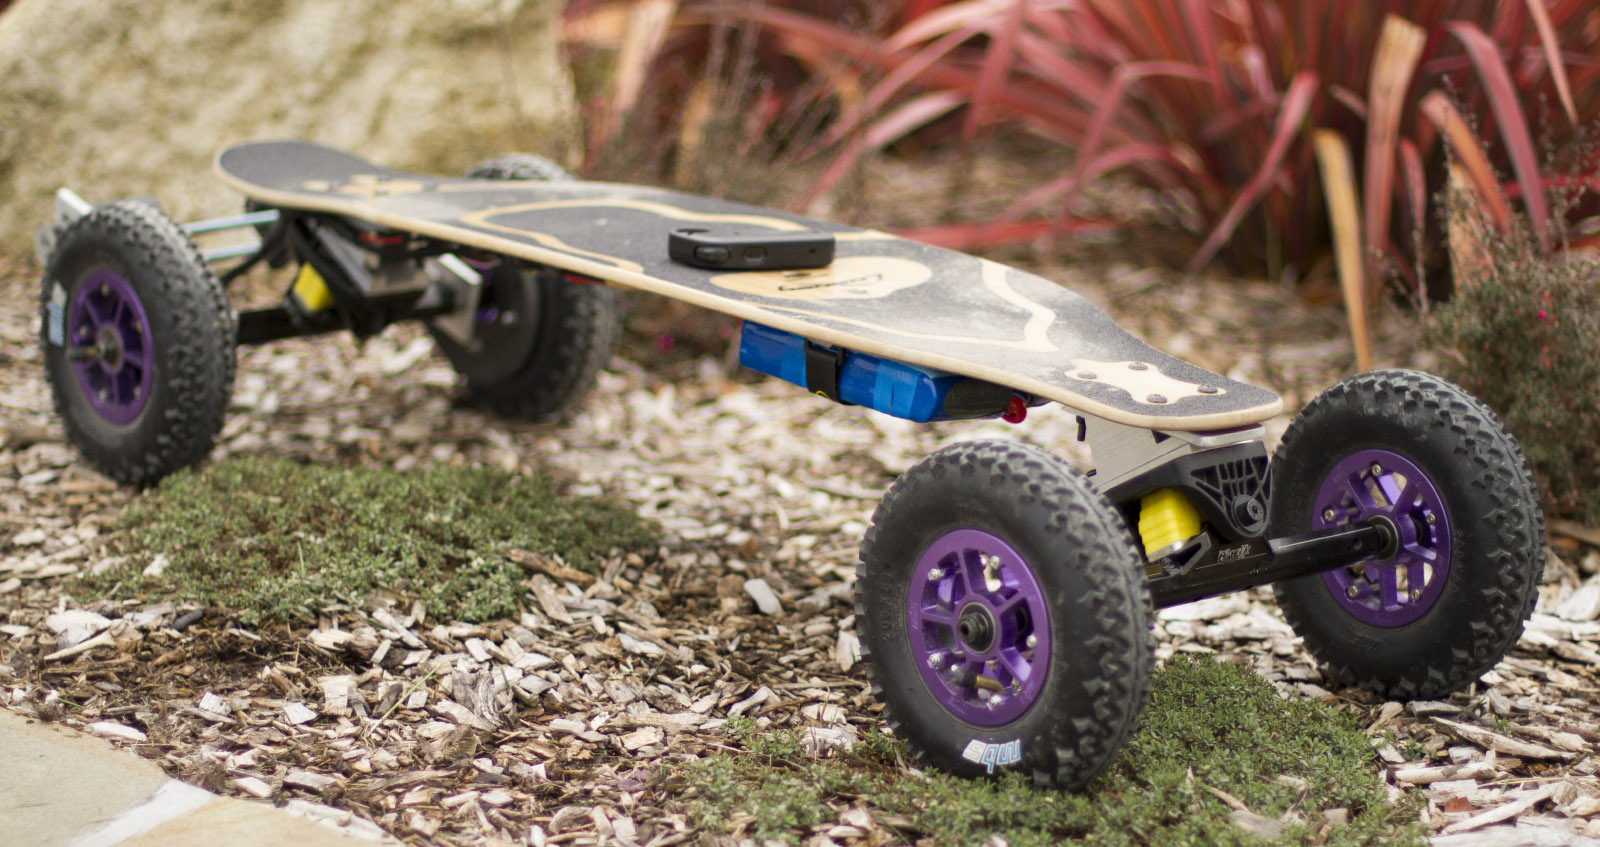
My board reaches speeds of about 20mph/35kph, rides smoothly over many terrain types, can power me up steep hills, charges the battery while braking on the way down, and is way more fun to ride than I actually expected! It’s controlled with a wireless controller, and has a range of about 10 miles/20km. All up the price to build it was comparable to purchasing one of the Evolve GT boards, but if something goes wrong I can fix it myself, and it was loads of fun to build.
OK, but why an electric skateboard?
The first step to building an electric skateboard is admitting you want an electric skateboard.
There are quite a few reasons someone might want a powered skateboard. Many people are buying or building them to commute to work or school. Some are simply looking for a fun ride, and it’s a bit viral, if you see someone riding one of these, there’s a decent chance you’re gonna want to give it a go.
For me, I’d never seen an electric skateboard in the wild. I was thinking about buying a mountain bike so I could take my kids out on their bikes, and have some hope of keeping up with them. But I’m not really into bike riding, I like surfing and snowboarding, a skateboard is more my style.
It suddenly struck me, hang on, surely electric skateboards are a thing? Maybe off-road ones?
So I googled, and it turns out they are definitely a thing. It’s a relatively new industry, but by all appearances a rapidly growing one, and there are numerous pre-built e-skateboards you can buy off the shelf, from custom 4WD all-terrain beasts to cheap single motor Chinese knockoffs, there is already a plethora to choose from.
For my end goal of keeping up with the kids, I needed to be able to ride on rougher than normal terrain. They will be at least occasionally riding on fairly rough gravel and limestone tracks we have near by, and I didn’t want a small stone to be an imposing obstacle.
The all-terrain goal narrowed my options significantly. The vast majority of e-skateboards out there are designed solely for urban conditions, there were only a few options with pneumatic wheels for bumpy terrain. But I found a range that suited my requirements perfectly, the Evolve GT.
Carbon fiber isn’t really my style, and when I saw the Evolve Bamboo GT was coming out I kind of fell in love.

So I attempted to pre-order, but from just across the Tasman Sea in Brisbane where Evolve are located, there was no option to ship to New Zealand. I emailed them, and they responded quickly, but apparently they had issues involving shipping batteries or something mumble mumble. They’re trying to sort out a New Zealand distributer, they mentioned October 2016. But I guess I just got a little annoyed maybe in a trans-tasman rivalry kind of way that these Aussies can’t be bothered sorting out shipping to their little neighbors out east.
So let’s build one
I did a whole bunch of research, by which I mean I watched a few YouTube videos, browsed some forums for a bit. I was then smart enough but still stupid enough to get started!
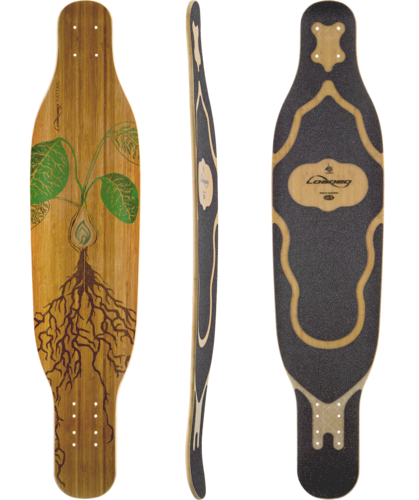
The first decision was the deck. I decided I wanted one that could be sourced locally, was made of bamboo (because of my Evolve Bamboo GT crush), was narrow enough top and bottom so that there was no danger of the wheels rubbing against the deck while turning, and didn’t have a complex underside that would be difficult to mount electronics to.
I specifically didn’t want a mountainboard deck because they are too low to the ground to fit the electronics and batteries underneath comfortably, and I didn’t want to be strapped in.
So the deck I ordered was a Loaded Fattail. It’s fantastic, I love it.
Trucks/Wheels
Next was the trucks and wheels. Off-road skateboard wheels are a pretty rare thing. Turns out they are almost exclusively used on mountainboards, which are themselves quite a different beast, sort of a hybrid between a snowboard and a skateboard. They have bindings to strap your feet to the deck, and the board curves up at the front and back, so the trucks are mounted on angled parts of the deck, which makes their design quite different (and caused some issues, more on that later). I didn’t really know any of this, and was just looking for off-road skateboard wheels/trucks, found very limited options, and just made a decision and ordered something.
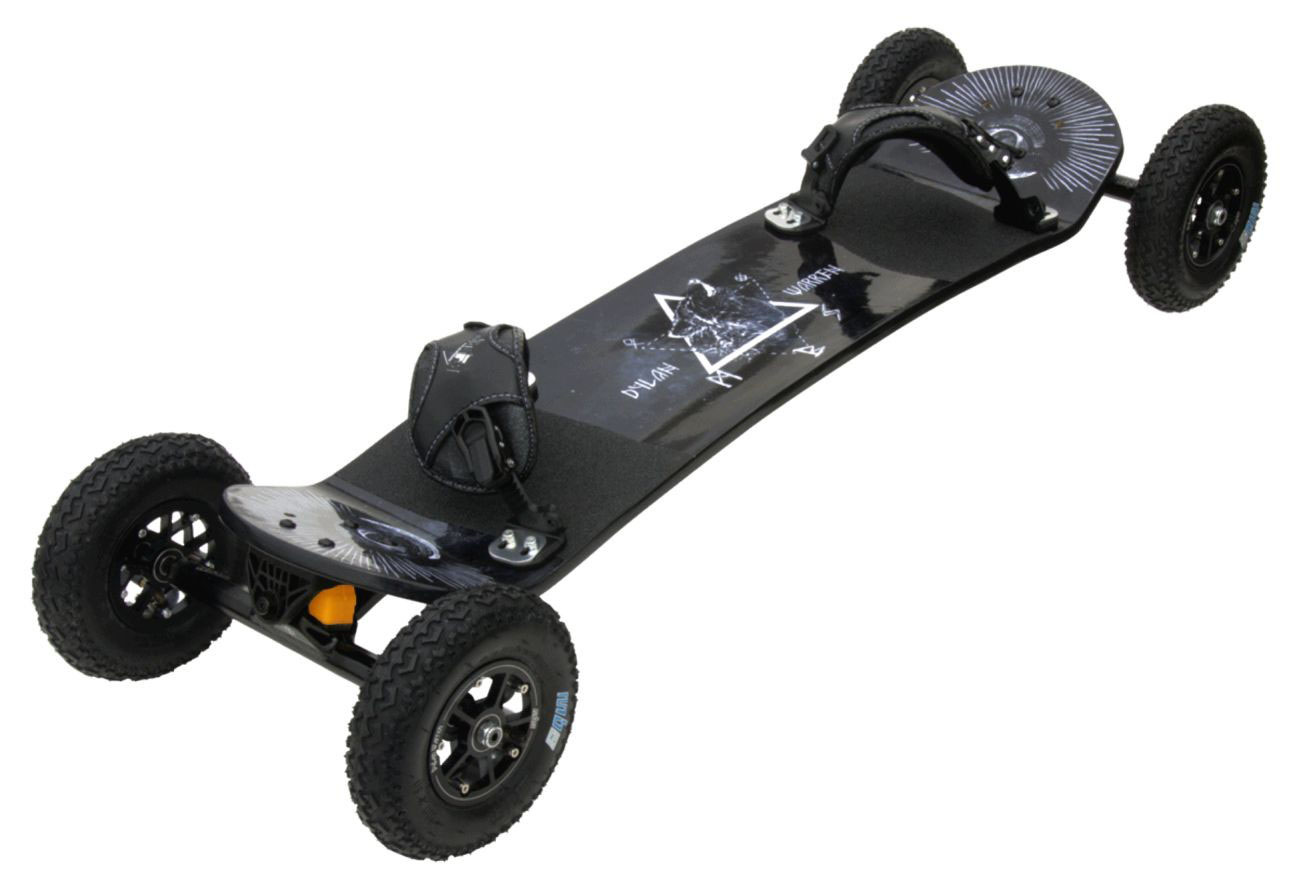
For the wheels/trucks I ordered MBS Rockstar Pro hubs with 8 inch tires, and Matrix Pro ii trucks. This shit was expensive, it was top end pro mountainboarding gear and pushed the price up well beyond that of a normal e-skateboard. I wanted to go with quality as by going electric I might be pushing them beyond what was normally required. But I think I could have gone with a cheaper truck system, and mounting motors on those trucks was a pain in the ass, as they have a very complex profile (more on that later too).
For any fellow New Zealanders, use YouShop for stuff like this, and order direct from the US. That’s cheaper than using the Australia based distributer, and there are pretty much no NZ based distributers.
This is the trucks and wheels I used, but on an actual mountainboard:
Drive Train
With the trucks and wheels locked in, I needed to decide on the drive train and electronics. Some of these mountainboard style builds use gears and chains, but the vast majority of e-skateboard builds, including the Evolve boards use belts and pulleys. I did quite a bit of research into all of this as you really need to get the ratio right. The problem is that the motors spin too fast to drive a wheel this size directly. Hub motors are an interesting development, they run a lot slower which removes the need for pulleys and belts for builds with smaller wheels, however the torque is still too low for an all terrain build with large 8 inch tires.
If you take a normal 170kv brushless motor and stick an 8 inch wheel on it, you would get a theoretical maximum speed of something over 100km/h but you would have such low torque that you wouldn’t be able to get the thing moving, especially up hill, much like trying to start a manual/stick-shift car that only has 5th gear.
So you have to decide on a reasonable top speed, and get the right motor/pulley/belt mix to achieve that, but no more. And with big 8 inch wheels, you need to step down that motor speed even more. I decided on a top speed of roughly 30-40 km/h (20-25 mph). 8S seemed like a good voltage given the batteries/components I was looking at, and the lowest kv (kv is basically the motor speed at a given voltage) good quality motors were around the 170kv mark. This useful spreadsheet from a truly hideous site told me that to achieve a top speed of 35km/h with a 170kv motor at 8S voltage with 8 inch wheels with a 16 tooth 5mm pitch motor pulley, I needed a wheel pulley with 72 teeth.
If that sounds like gibberish to you, I’m sorry, it did to me too, but I figured it all out in the end. I won’t try to explain it all in any finer detail here, happy to answer questions about any of this in the comments.
So yay, now I just need to order some pulleys in something around those sizes and a belt to match, and I’m good. Except that everyone who builds electric skateboards uses a particular standard of pulley/belt, and that is HTD, with 5mm pitch (that’s 5mm between the teeth), at 9-25mm width. And the plastic pulleys available for that type of belt max out at about 50 teeth, not the 72 I needed. I don’t really know why that is the case, but I looked all over the place. You can get big HTD pulleys in aluminum and cast iron, but that was expensive, heavier and just way overkill for the wheel pulley. I was also concerned about working with metals, at the time all I had was a hand drill and a hacksaw, and no experience.
So I decided on the XL standard at 9mm width, which as far as I could tell no one had tried for electric skateboards. It’s also 5mm pitch, but has a shorter tooth depth, so wouldn’t have quite as much traction as the 5mm HTD. They are probably roughly equivalent to 3mm HTD. I ordered these pulleys from STP/SI:
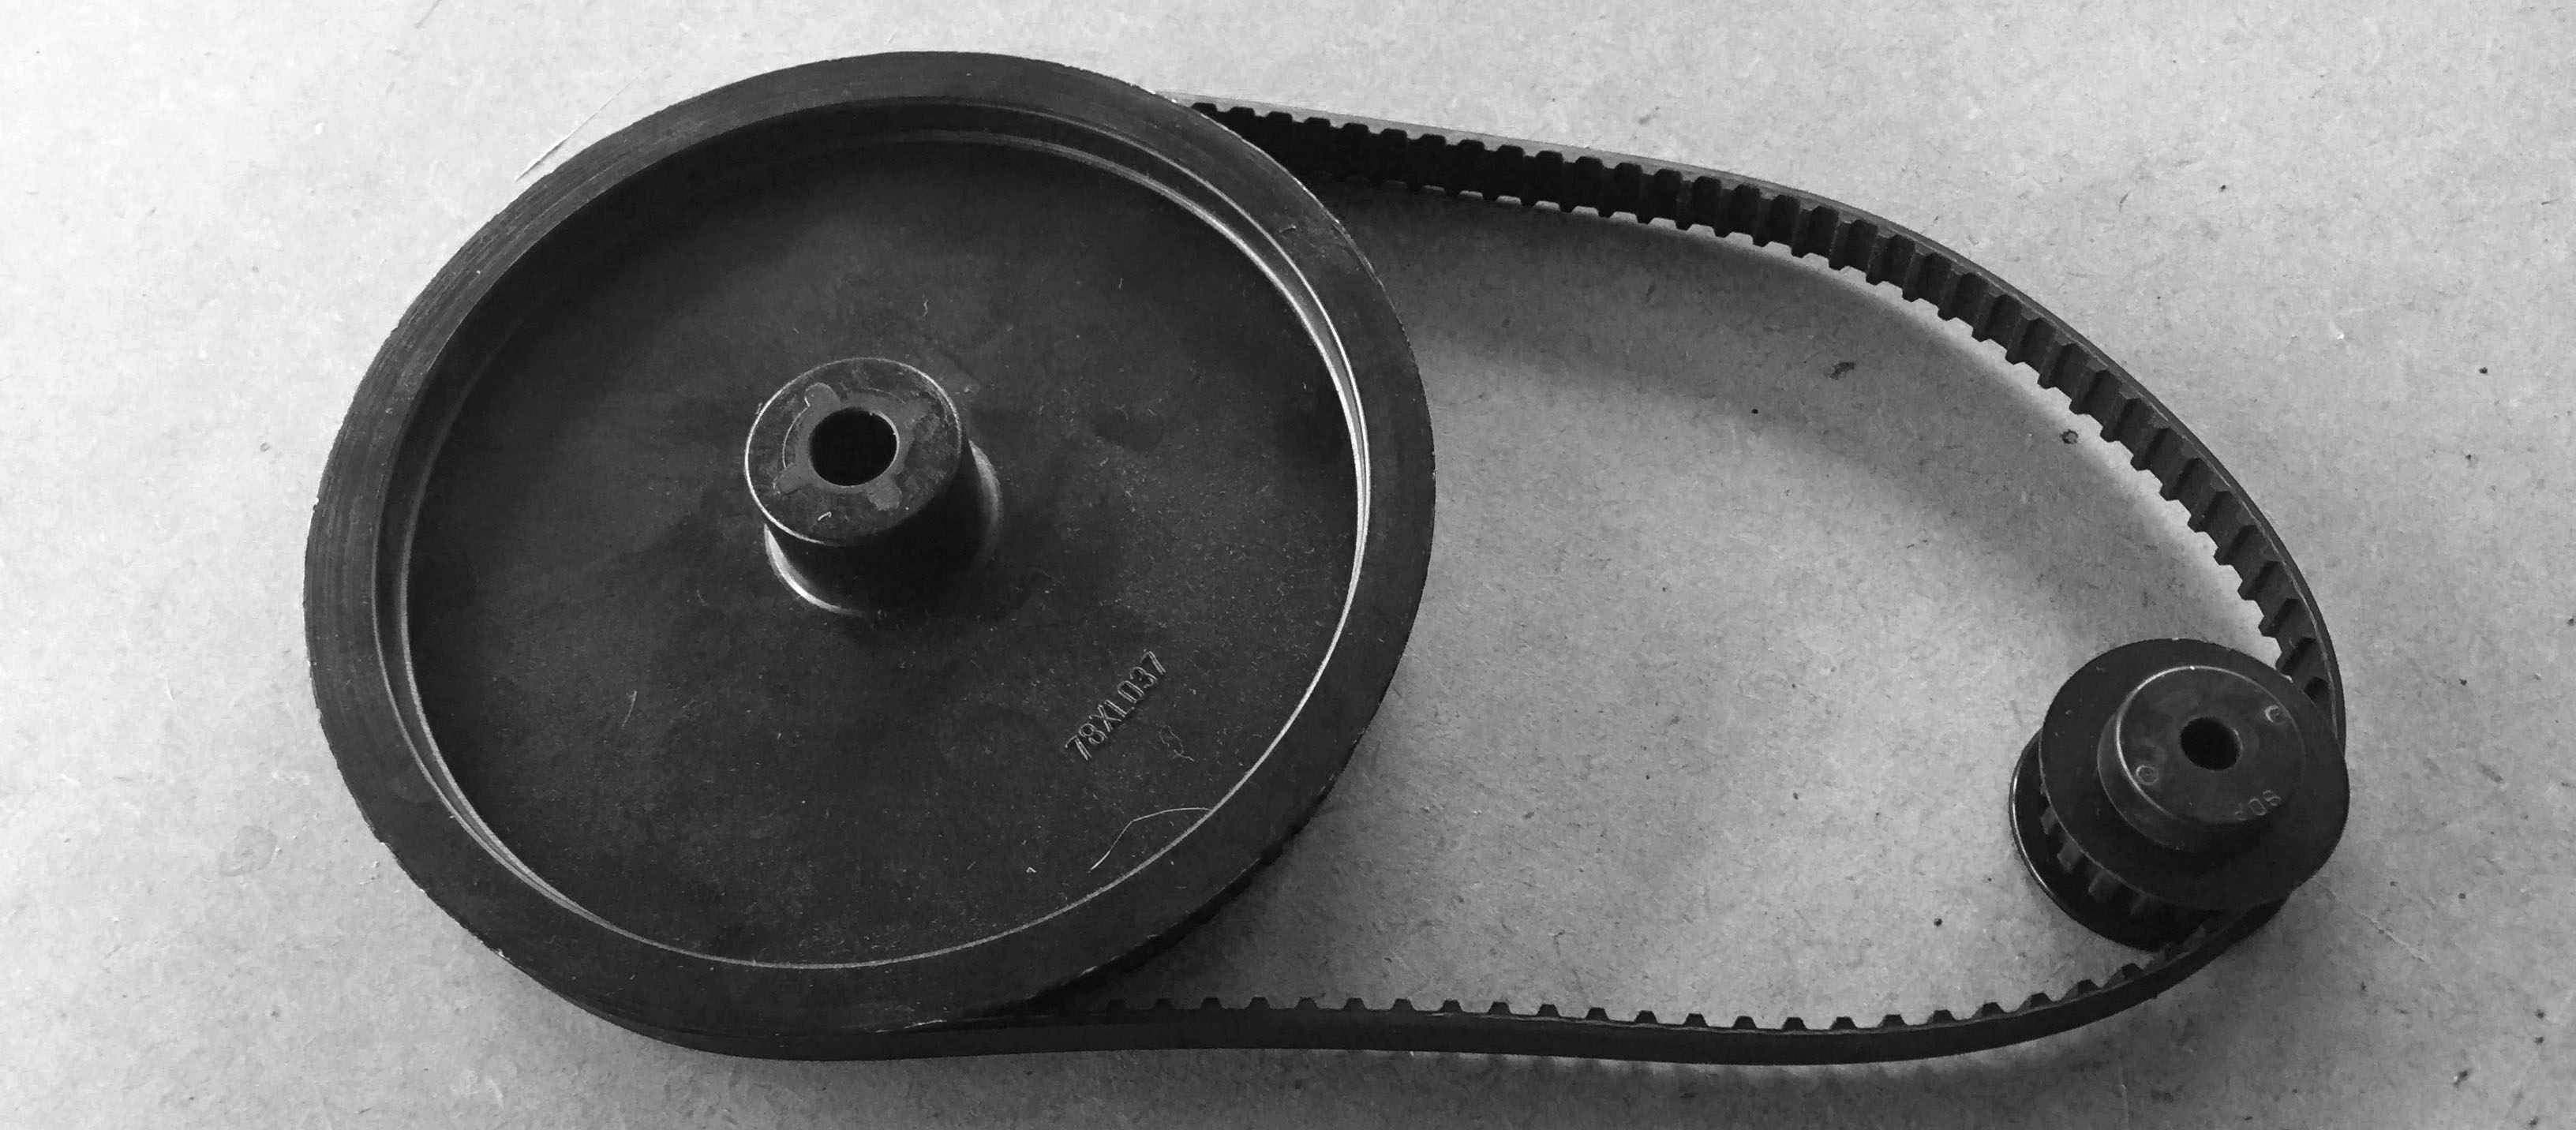
It’s worth noting here that I ultimately regretted buying the plastic motor pulleys (not the wheel pulleys, the large pulleys are fine in plastic), and replaced them with these aluminum ones instead, which are much, much better.
The belt length I calculated using this website.
I got a 116 tooth belt as a result, which is exceptionally long, and caused me a some issues. I went with that length to ensure that 6 teeth were engaged on the motor pulley, and given my experiments with belt tension I think this length was probably necessary with this 9mm XL configuration to avoid belt slippage, at least without some sort of belt tensioner. I am still experiencing some belt slippage under heavy braking.
Dual or Single motor - 2WD or 1WD? Or 4WD?
The easiest option to get rolling is to go with one motor, one speed controller, one set of belt and pulleys driving one of the wheels.
But I went with a dual motor design. There is a single power source of two 4S batteries in series, and that is split to two speed controllers and motors in parallel, driving the two rear wheels via two sets of pulleys and belts.
Going with dual motors doubles the cost for the drive train and most of the electronics, and is almost twice the work. But I did this because I was concerned about torque and traction.
Partly my torque concerns were related to the lighter-weight XL belts. But also, this is an off-road board. I wanted to be able to ride up and down hills, and have power at low speeds and traction on bad surfaces. And I’m a Dad. That means I have a new-found respect for safety. It turns out that the speed controllers can apply reverse torque to the motors and act as a very effective brake (and even recharge the battery while doing so). And braking is a lot better on slippery surfaces with two wheels rather than one.
I doubted my dual motor choice for a little while during the build, when I was having to make double the parts, and double the fixes when I screwed up, but ultimately I absolutely needed two motors for this board to work the way I wanted. Occasionally, due to minor wiring issues that I’ve now fixed, one motor has dropped out while I’ve been testing, and it really is half the board without that second motor.
One motor might be OK for flat, sealed surfaces or short, even grass. 2WD can handle some decent bumps and quite long grass, but struggles a bit on real nasty off-road surfaces like soft sand or really bumpy/slippery surfaces up and down hills. 4WD would be ideal.
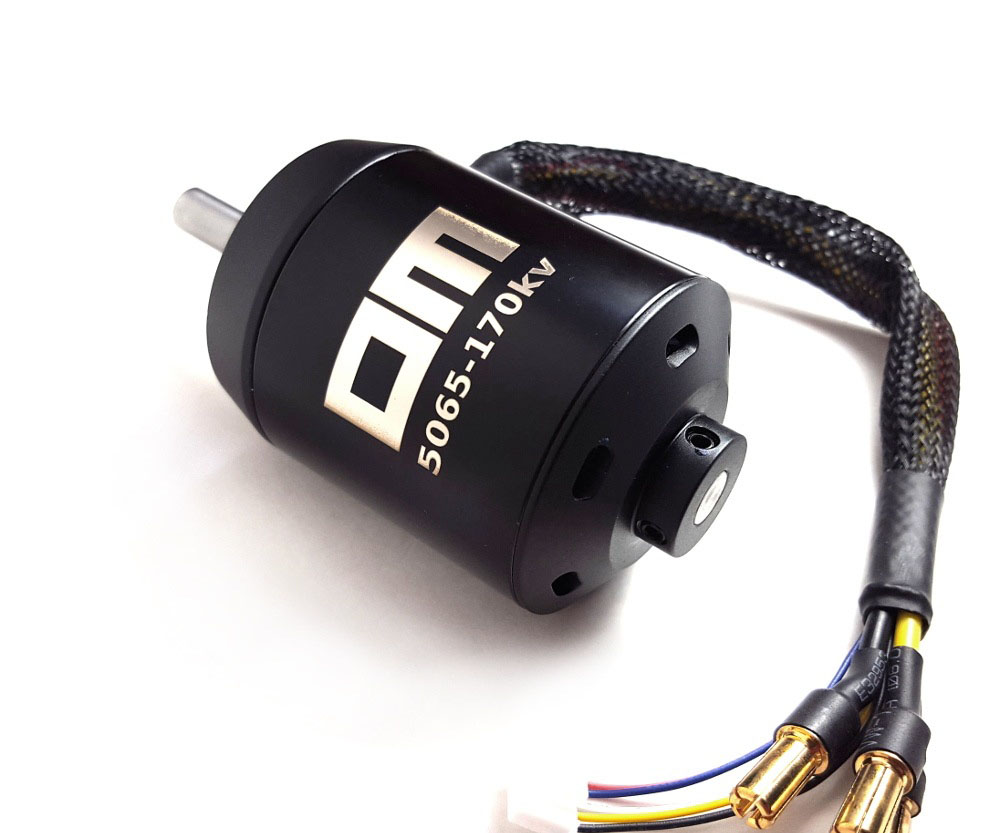
Motors and ESCs
I initially ordered a pair of 170kv EMAX 5345 motors, but actually damaged one when stupidly hammering one of those plastic pulleys onto it too hard. It’s a shame, I really wanted to try them, and might still try a build using the good one. But after learning a little more, rather than ordering a replacement, I decided that I would order a new set of 5065 motors from Ollin Board Company. There have been claims that these are the exact same motors as used on the Evolve boards, but I’m not sure. Regardless, they have sensors, so you can wire them up to the VESCs for smoother starts from stationary. They’re also smaller than the EMAX motors, and have less gaps to allow dust into the coils. I’m very happy with them.
ESC stands for Electronic Speed Control, and it’s basically a circuit board which takes power from the battery, and the signal from the wireless controller, and drives the motor to make it spin at the desired speed. Initially, coming from my quadcopter building background I thought of them as fairly dumb. I thought I’d just buy a remote control car ESC, wire up a controller input and it’d work. And you can do it that way. But a clever guy name Veder from the e-skateboard community has developed an open source specialized e-skateboard ESC which includes an STM32F4 chip to allow far greater customization and control. The more I looked into the VESC, the more it seemed like the best way to go, so I compared all the options and decided on Enertion’s VESCs.
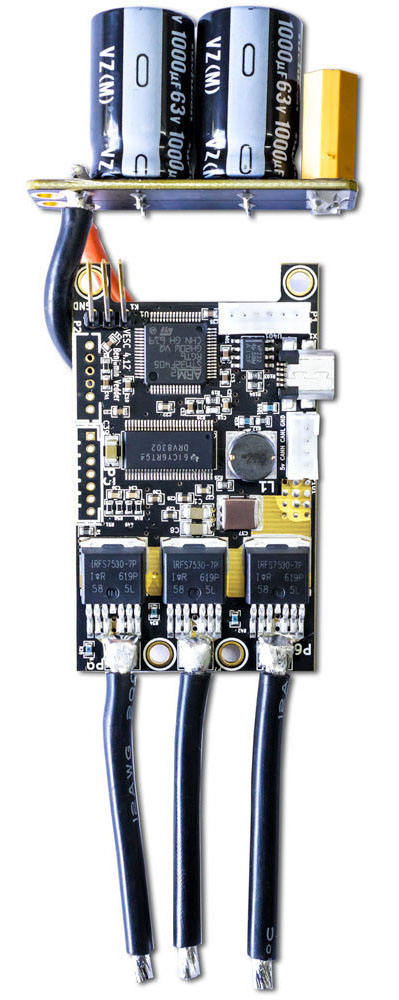
Some people have had issues with Enertion’s VESCs, and when I bought there were a few other options for purchasing them from different sources, mostly at a higher price with claims of better quality. But so far I am very happy with them. But even as I write this, you can no longer get the version I used. This is a rapidly changing space, shop around and do plenty of research.
There is no doubt though that any VESC is worth the price premium over any standard RC car ESC. You get a nice cross-platform GUI tool to configure everything from max speed to regenerative braking to traction control and battery voltage cut-offs. And it provides much finer control over the motors, so low speed in particular is a lot smoother and quieter.
Wireless Controller
The controller was a little tricky, there were a few options but all had issues of some kind. It’s relatively simple tech, but for skateboarding you want a nice smooth throttle control trigger, with a neutral midpoint, and braking when you pull back, and you don’t really need anything else. There are RC car remotes that have this trigger functionality, but they are bulky and include steering mechanisms. So people buy those, and in decent numbers, all the recommended ones are currently sold out everywhere. Then you can rip them apart to package the important bits into smaller custom enclosures.
There are also some controllers based on the Nintendo Wii nunchuck. That is a wired proprietary thing and a bit difficult (though possible) to make work, but some clever people found that one particular 3rd party wireless nunchuck, the Nyko Kama could be disassembled and used to control electric skateboards relatively easily.
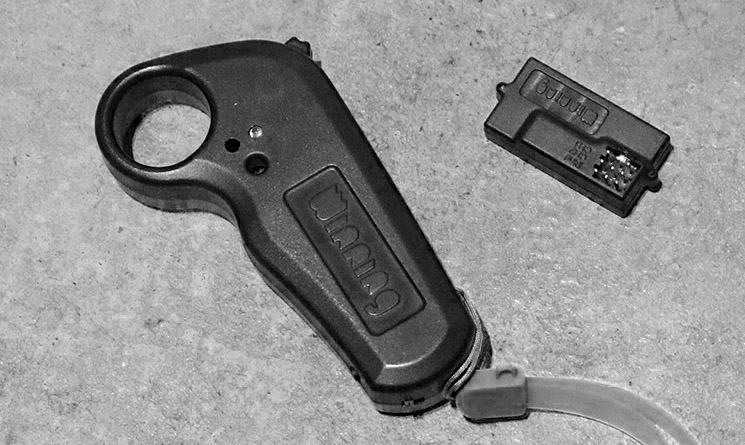
Unfortunately, again, both of these were sold out everywhere I looked. Luckily there are also a few newer solutions popping up that are custom designed for electric skateboard control. They are available from some of the main electric skateboard parts suppliers, as well as from group buys on the esk8.builders forums. I’ve ordered a couple, and had a few issues, as have many people who have bought them. They are mostly fairly cheap and broken, but when they work, they are great. My “Winning” controller which I ordered from DIYElectricSkateboard has some LEDs wired the wrong way around, but so far I haven’t had a fault while riding from it… luckily….
Batteries, bolts, bits and more bolts
I shopped around for batteries, but options are limited in NZ, shipping is difficult due to the airlines aversion to explosions in their cargo holds. There is a weird obsession with Li-ion batteries in the community, they seem more complicated than necessary, with no real benefits over LiPo as far as I can tell, and a whole bunch of complications. I may be yet to be proven wrong about that, but so far my 2x 4S 8000mAh Zippy LiPos from HobbyKing have worked a charm. And of course I needed a charger, but I already had that from my quadcopter stuff.
I’ve needed a lot of nuts and bolts, a surprising amount, like well over a hundred bucks worth. This is partly due to the experimental nature of my build, I have lots of leftovers and even a few unopened packs. But it’s something worth mentioning anyway. One major problem was actually sourcing M4 bolts long enough to go all the way through the hubs, spacers and then the wheel pulleys. Visiting all the local hardware stores in in their obscure industrial park locations to find these things was actually pretty fun though.
I also needed some thicker than normal 10AWG wires, XT60 connectors, velcro straps, and a few other bits and pieces that I mostly had on hand thanks to my quadcopter builds.
OK enough, let’s get to the build.
I first had to angle the mountainboard trucks at roughly 35°. I realized pretty quickly after ordering those trucks that if I didn’t angle them, I was going to have a very hard time turning. That angle allows you to turn when you lean. Normal skateboard trucks mount to a flat deck, but have that angle built in to the trucks. So I set about making some wedges out of what I felt comfortable working with, which was plywood. I glued a bunch of smaller bits together using contact adhesive, created a block, then cut it diagonally. Then I hand drilled holes in all the right places.
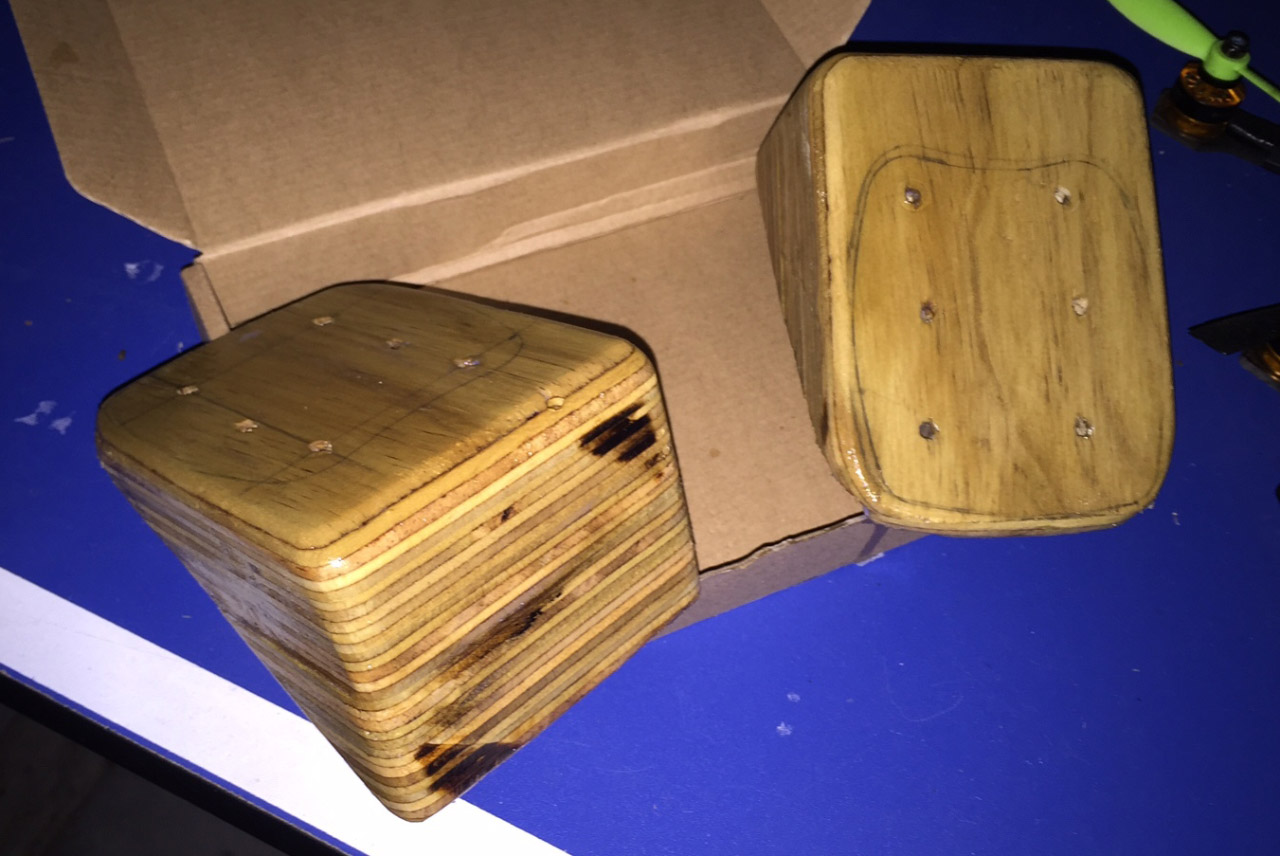
That alone was sort of a tricky process, but the results though less than ideal where enough to get me going. I’ve now created aluminum replacements for these wedges, as the plywood versions had issues with loosening up after a few rides, and would probably fail completely. But making the aluminum ones to start with would have been much harder. I now consider the plywood ones a prototype, and a valuable learning experience.
Anyway, with the trucks mounted to the deck, and the wheels assembled and pumped up (an air pump with a PSI gauge was yet another hidden cost here, the costs keep mounting…) I was good to take the board out and roll down some grassy hills!
That first un-powered ride gave the first inkling of how this might feel to ride when it was done, and I loved it. There were only two issues, one was having to walk back up the hill, and the other was having no brakes. And the motors would fix them both. I was pretty excited.
The pulleys
I then got on to attaching the wheel pulleys to the wheels. I decided the best way to do this was to replace the five M4 bolts that the MBS hub came with to hold the wheel together with longer ones, extended with spacers (I used a bunch of nuts) to then securely fasten the pulley. That worked out pretty well, though I feel like there is a little wobble introduced by non-perfect centering of the wheel pulleys. It’s good enough though, there is also wobble just caused by the MBS wheels/hubs not being very well balanced.
With the motor pulleys though, I had massive problems. The first issue was that I thought I could just drill out the 6mm bore to 7.5mm, and whack it onto the 8mm shaft for a nice tight fit.
Nope. For starters, using a hand drill at my skill level was no-where near accurate enough. I ended up with terribly off-center results, which caused major wobble in the drive train. Even with a drill press I couldn’t get satisfactory results enlarging the bore.
The other major problem with that plan was that the 7.5mm hole was just too tight for the 8mm motor shaft. I kept trying though, and whacked away with a rubber hammer until I completely ruined my motor bearings.
After ordering new replacement motors I was a lot more careful, and went and bought a pulley removal tool from an auto parts store. This allowed me to relatively easily both remove pulleys, and push them down, with a slow pressing action instead of a stupid idiot with a hammer action.
I did get the board going with the plastic pulleys, but they were never properly secure and had nasty wobble issues due to the off-center holes. I ultimately replaced them with these aluminum pulleys which came with an 8mm bore already and grub screws to get a tight fit, and they are perfect.
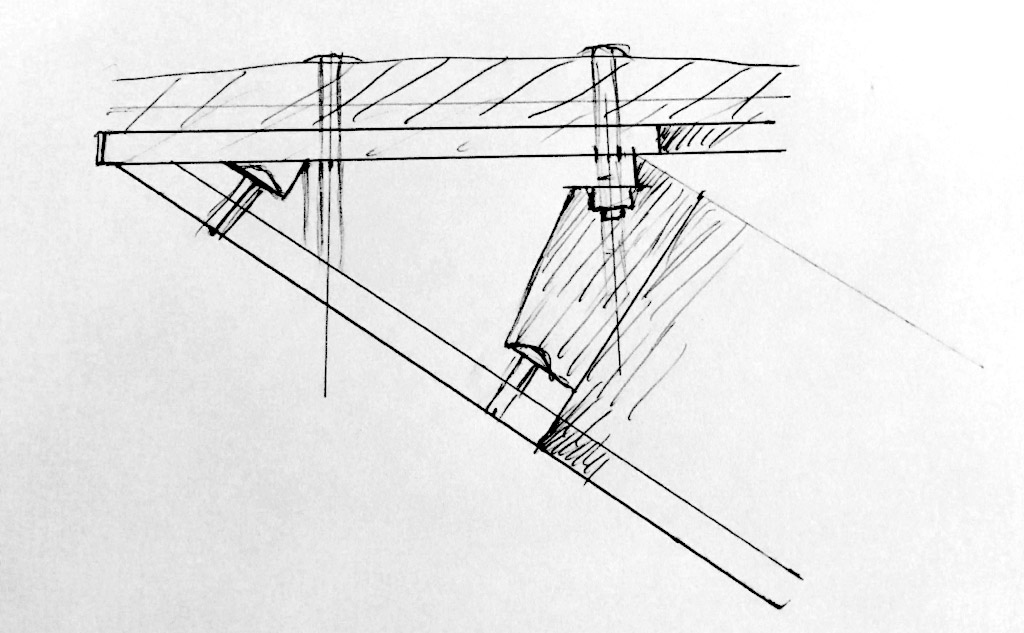
The Motor Mounts
The motor mounts were the biggest challenge of the whole build. Had I been building a normal sort of skateboard with the likes of Caliber trucks that most people used, I could have ordered from a range of off the shelf quality motor mounts. But no one was selling motor mounts for the MBS trucks, especially not at the unusually long belt length. So I had to make my own.
The reason this is difficult at all is that the motors have to be mounted to the trucks and not the deck. The wheels move a bunch relative to the deck, and the wheels are where the power needs to go. So the motors need to be rigidly connected somehow onto the wheel axle.
Initially, just like with the wedges, I tried making plywood motor mounts too.
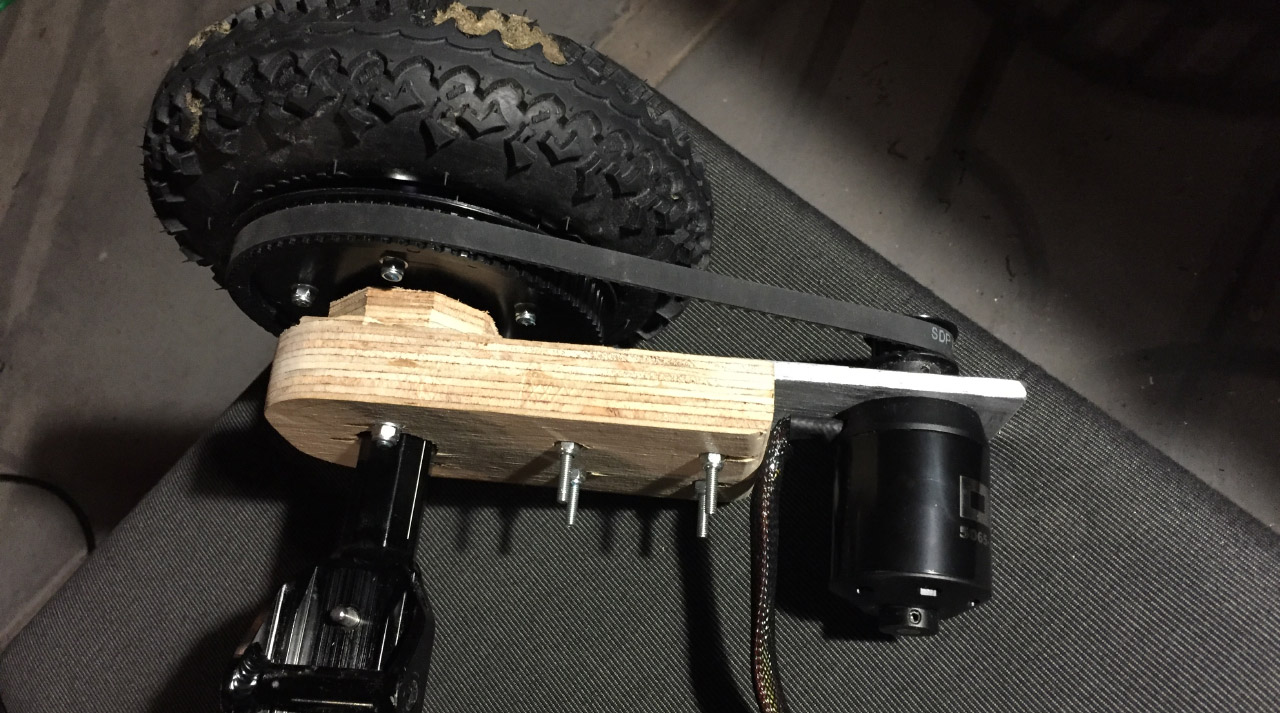
This sort of wasted a bunch of time, because ultimately I found that the required tension of the belts was high enough that it would easily compress the wood, quickly bending them out of shape. So I ordered some aluminum bars. It actually took me a while to find that “bar” terminology, I thought I was looking for “sheets” but an aluminum sheet generally comes in large sizes and is very expensive. Rectangular bars in 2 inch wide by 1/4 or 1/2 inch thick dimensions were relatively cheap and easy enough to source.
So I started drilling lots of holes and it quickly became clear that I suck at drilling holes, and needed a drill press. Absolutely, a drill press was needed. It changed the whole game, and now I could drill aluminum with ease, and get actually straight holes.
With the drill press I was able to create some decent enough mounts. I used an angle bracket to secure them to the trucks via an M8 threaded hole in the trucks that was designed for the MBS braking system.
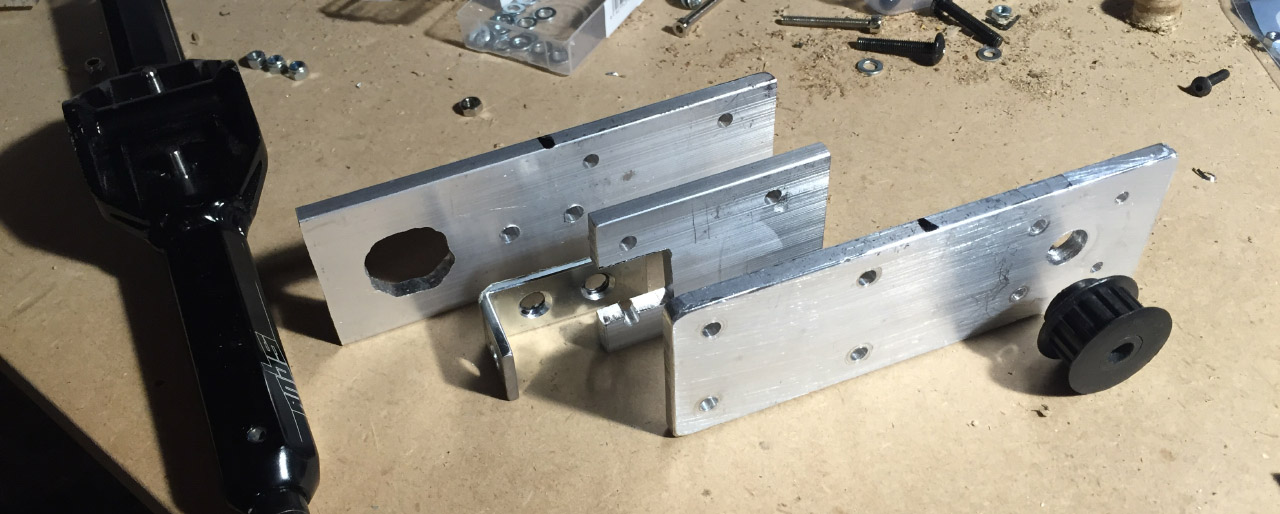
Getting the motor mounts nicely aligned and secure was a continuing issue. Once I went to aluminum motor pulleys things got a lot better, and I also added two M8 threaded rods to stop the belts from yanking the motors outwards, as there is a lot of flex in the mounts. The threaded rods work great, but they sort of mask other issues. The motor really needs to be aligned perfectly, and with the inaccuracies in my mounts, and also inconsistencies in the locations of the brake holes in the MBS trucks, my motor mounts are anything but perfect. I don’t begrudge MBS for the brake hole thing, it probably doesn’t matter too much for their brakes, it just happens to matter for what I’m using them for!
The wiring
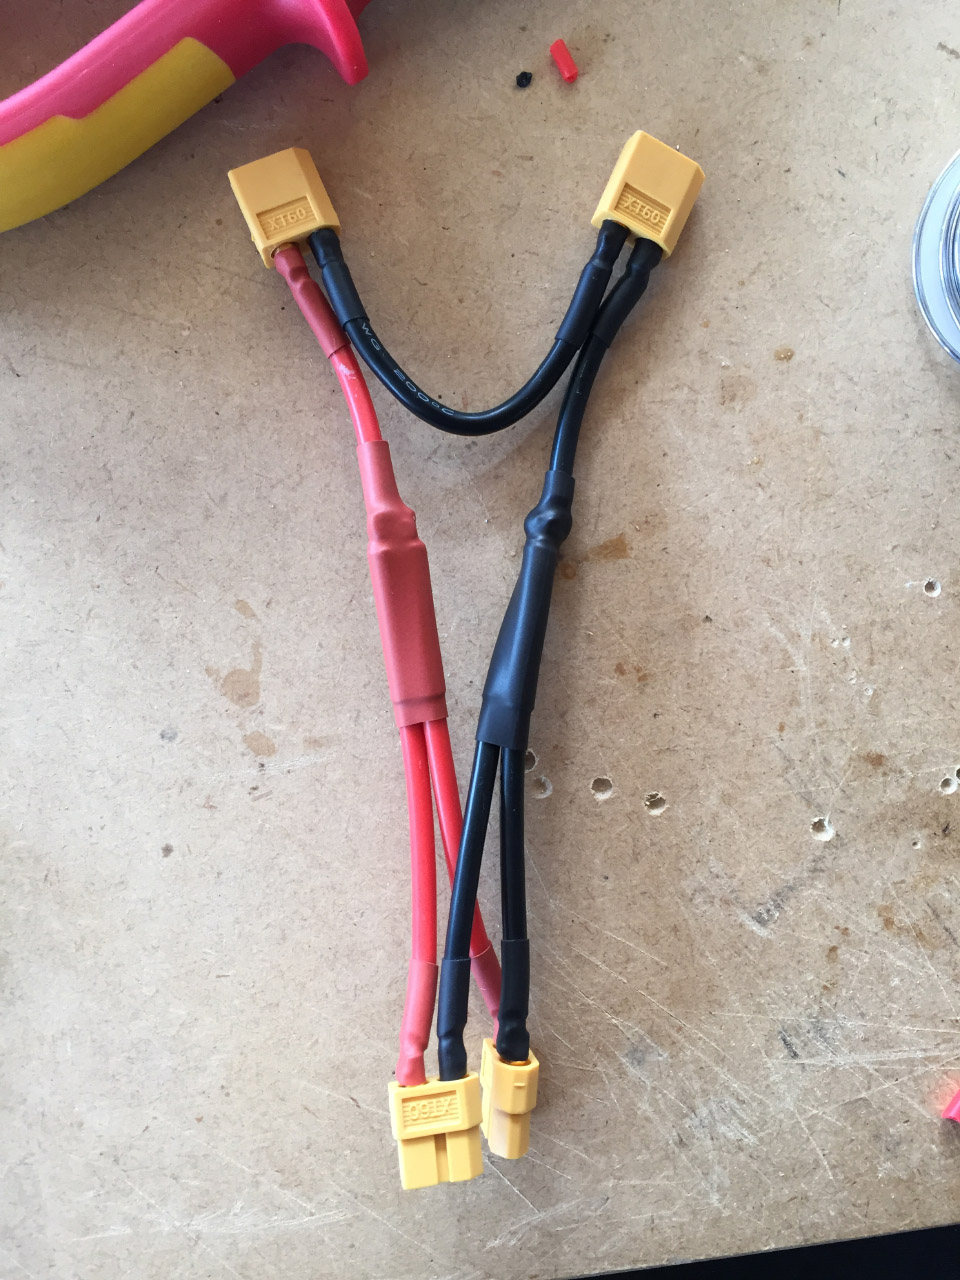
Probably the biggest wiring job was creating the connector that hooked up the batteries to the ESCs. I wanted the two 4S (14.8v) batteries in series to act as an 8S (29.6v) single power source. That then needed to be split to the two ESCs in parallel. So I made this flux capacitor:
The receiver for the controller was a little box that needed 5v and provided a signal, pretty much plug and play. The only tricky thing is that with two VESCs, you need to either split that control signal or wire the two VESCs together and configure one as the master which receives the controller signal, and one as the slave which does what it’s told. I opted for the later because it has the added benefit of traction control.
I initially used a JST connector to connect the two VESCs together (over the CAN bus connection), but it kept falling out and causing issues even with hot glue, so I ended up soldering wires to the pins. With quadcopters I would desolder all the connectors and solder all the wires directly, but these VESCs are a lot more expensive, and I’m just trying not to screw anything up!
Using sensors on the motors made things more difficult, I had to extend all of the wires as the motors were too far from where I wanted my ESCs. So that was 5 extra wire extensions, and there was some confusion over where to plug them in. But this post helped me figure it out.
The configuration
Finally I could connect everything and get going, but I had to set up a few things in software first. I downloaded the BLDC Tool which is used to configure the VESC. This all seemed a bit hard and dodgy and weird to be honest. Not terrible, but sort of Minecraft mod level of weird, where you’re not sure if the links you are following are outdated, and some of them lead to dead ends, and you have to install something you don’t really trust.
But it all worked out OK. The VESCs I ordered were running the latest firmware already, and I managed to find a current OS X version of the tool which worked. The tool itself is great. I first ran the motor detection for each motor, and adjusted the voltage settings and a few other things (there are tutorials for all of this stuff). Then I set up the controller and CAN-bus master/slave configuration.
Once the motor is detected, you should be able to control it with the right and left arrow keys. One of my motors was acting a bit weird, it rotated initially, but then just started twitching and not really working. I was told to watch out for “cogging”, that this would blow things up if you applied too much throttle. This was almost certainly the dangerous cogging, but I wasn’t sure if it was only because I was only providing the ESC with 4S voltage. Anyway, I decided given one motor was looking good and spinning the right way, and one wasn’t, I would swap two of the phase wires to reverse the motor direction and try again. After I did that it was fine.
The controller configuration wasn’t well documented and had me confused for a while. I thought it would just work, but out of the box it would do nothing while I accelerated, then if I hit the brakes it would suddenly go to max throttle. This behavior actually makes perfect sense given the default values after I learned that you need to tell the VESC what the max and min pulse width of your controller is. This seems like something lot’s of people might have issues with. You need to set your pulse widths in the BLDC tool before attempting to use your controller.
The absolute JOY YOLO
My first couple of rides were not without incident. A battery fell off on my first ride, because it needed a proper strap, not simply velcro. My mounts wobbled, and I fell off a few times.
But even my first ride back and forth on the gravel was super fun. Then I tried going carefully up and down the drive, falling off at walking speed every few meters. Then I took it to a park, started to get a little confidence before the shock blocks fell out because I’d loosened them too much.
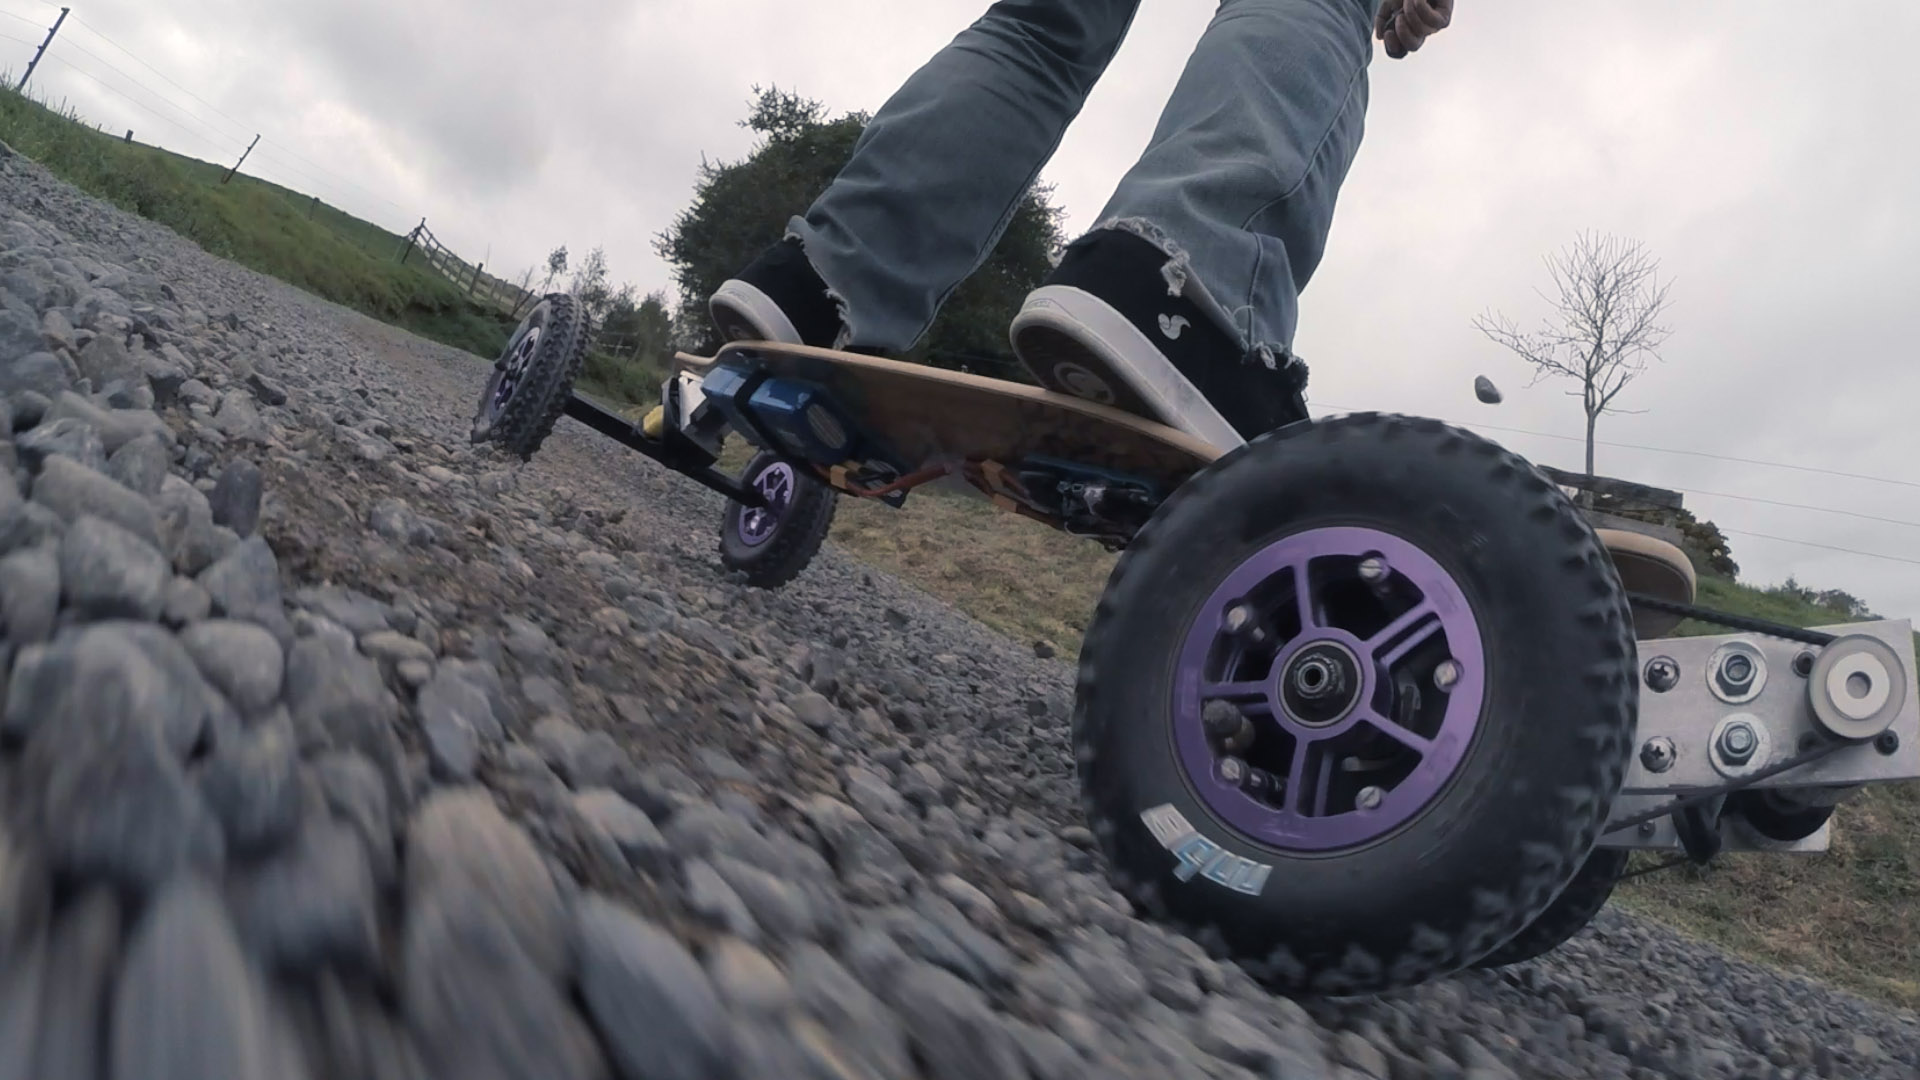
And then I had a pretty good session, reached about 20km/h, went over a bunch of terrain types and started to get some confidence.
Now I’m riding fine at full throttle. Flying around motor-cross tracks, exploring places I’d never go.
At the max speed of 30km/h or so I’m carving back and forth feeling the wind in my face. Kids are chasing after me wanting to know where they can get one. I am feeling like I am back from the future, with this newfangled contraption to surf the land.
My board is rough around the edges, but it’s mine. I made it, and it’s amazing.
Wear a helmet.